Conditional formatting rule based on formula
How to create a conditional formatting rule based on formula
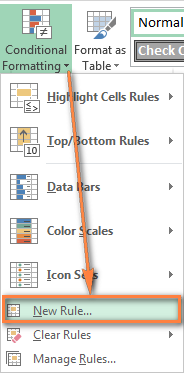
- On the Home tab, in the Styles group, click Conditional formatting > New Rule…
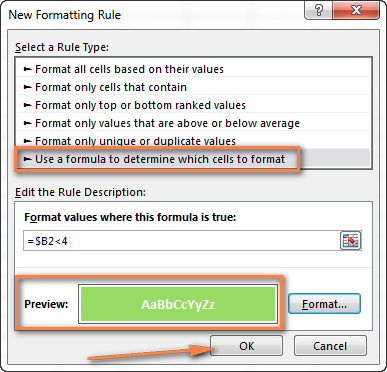
- In the New Formatting Rule window, select Use a formula to determine which cells to format.
- Enter the formula in the corresponding box.
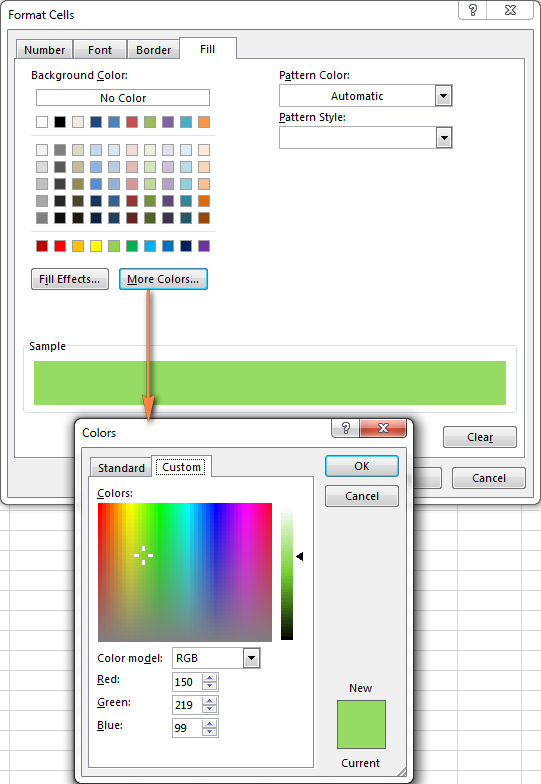
- Click the Format… button to choose your custom format.
- Switch between the Font, Border and Fill tabs and play with different options such as font style, pattern color and fill effects to set up the format that works best for you. If the standard palette does not suffice, click More colors… and choose any RGB or HSL color to your liking. When done, click the OK button.
- Make sure the Preview section displays the format you want and if it does, click the OK button to save the rule. If you are not quite happy with the format preview, click the Format… button again and make the edits.
Tip. Whenever you need to edit a conditional formatting formula, press F2 and then move to the needed place within the formula using the arrow keys. If you try arrowing without pressing F2, a range will be inserted into the formula rather than just moving the insertion pointer. To add a certain cell reference to the formula, press F2 a second time and then click that cell.
Excel conditional formatting formula examples
Now that you know how to create and apply Excel conditional formatting based on another cell, let's move on and see how to use various Excel formulas in practice.
As you know Microsoft Excel provides a handful of ready-to-use rules to format cells with values greater than, less than or equal to the value you specify (Conditional Formatting >Highlight Cells Rules). However, these rules do not work if you want to conditionally format certain columns or entire rows based on a cell's value in another column. In this case, you use analogous formulas:
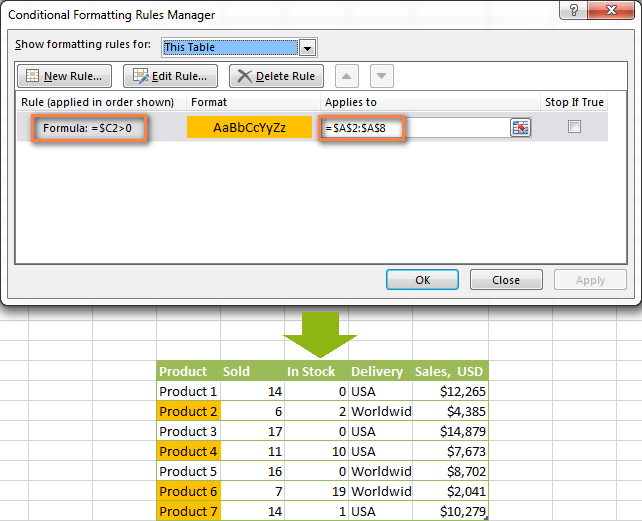
Condition Formula example Equal to =$B2=10Not equal to =$B2<>10Greater than =$B2>10Greater than or equal to =$B2>=10Less than =$B2<10Less than or equal to =$B2<=10Between =AND($B2>5, $B2<10)The screenshot below shows an example of the Greater than formula that highlights product names in column A if the number of items in stock (column C) is greater than 0. Please pay attention that the formula applies to column A only ($A$2:$A$8). But if you select the whole table (in our case, $A$2:$E$8), this will highlight entire rows based on the value in column C.
In a similar fashion, you can create a conditional formatting rule to compare values of two cells. For example:
=$A2<$B2- format cells or rows if a value in column A is less than the corresponding value in column B.
=$A2=$B2- format cells or rows if values in columns A and B are the same.
=$A2<>$B2- format cells or rows if a value in column A is not the same as in column B.As you can see in the screenshot below, these formulas work for text values as well as for numbers.
AND and OR formulas
If you want to format your Excel table based on 2 or more conditions, then use either =AND or =OR function:
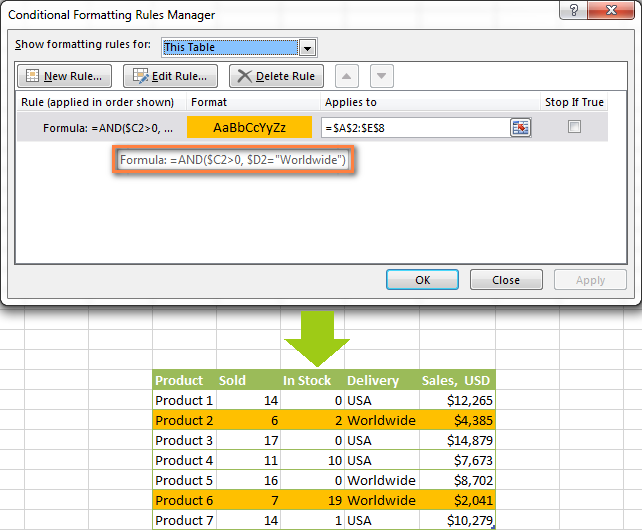
Condition Formula Description If both conditions are met =AND($B2<$C2, $C2<$D2)Formats cells if the value in column B is less than in column C, and if the value in column C is less than in column D. If one of the conditions is met =OR($B2<$C2, $C2<$D2)Formats cells if the value in column B is less than in column C, or if the value in column C is less than in column D. In the screenshot below, we use the formula
=AND($C2>0, $D2="Worldwide")to change the background color of rows if the number of items in stock (Column C) is greater than 0 and if the product ships worldwide (Column D). Please pay attention that the formula works with text values as well as with numbers.
